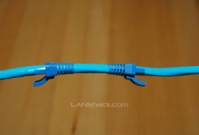
สำหรับวิธีการเข้าหัว CAT 6 ดูตามรูปได้เลยครับ
![]() 194x008_pli.jpg (174.09 KB, 480x495 - ดู 1349 ครั้ง.)
194x008_pli.jpg (174.09 KB, 480x495 - ดู 1349 ครั้ง.)
![]() 1.JPG (96.61 KB, 684x355 - ดู 1998 ครั้ง.)
1.JPG (96.61 KB, 684x355 - ดู 1998 ครั้ง.)
![]() 2.JPG (86.76 KB, 684x487 - ดู 2566 ครั้ง.)
2.JPG (86.76 KB, 684x487 - ดู 2566 ครั้ง.)
![]() 3.JPG (112.57 KB, 692x442 - ดู 3110 ครั้ง.)
3.JPG (112.57 KB, 692x442 - ดู 3110 ครั้ง.)
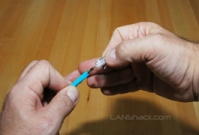
Patch Cable Assembly Instructions
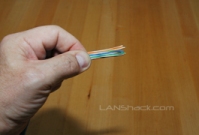
 1. Cut the cable to the length that you will need.
If you are planning to use boots, this would be a good time to slip them on.
Place each boot facing out on the cable.
 2. Skin the cable about 1.5down.
 For fast and dependable skinning we recommend our QuickTreX™ EZ Cable stripper.
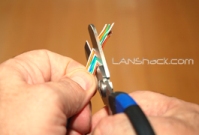
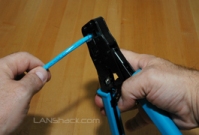
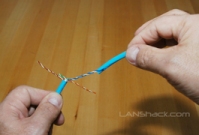 3. Remove all of the twists in the cables pairs.
TEC-TIP: Use a piece of the removed insulation to make it easy to remove the twists from each pair.
Un-twist each pair, and straighten each wire between the fingers.
 4. Cat 6 cable has a center spine that needs to be removed.
Pull on the spine and fold the pairs back.
Then cut the spine as close to the cables end as possible.
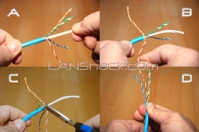
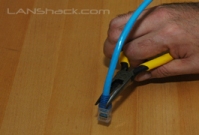
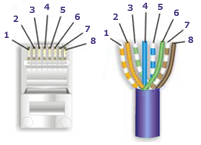 5. Place the wires in the order of one of the two diagrams shown above (568B or 568A).
Here we have chosen the 568B diagram which is by far the most popular.
If you are unsure, go with the 568B wiring.
 6.Bring all of the wires together, until they touch.
Hold the grouped (and sorted) wires together tightly, between the thumb, and the forefinger.
At this point, recheck the wiring sequence with the diagram.
 7.TEC-TIP: Cut the wires on a very sharp angle to make it easier to install the load-bar(in the next step).
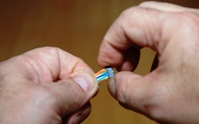 8.Insert the loadbar on the wires one wire at a time.
 This is why we recommended cutting the wires on an angle.
We recommend our QuickTreX™ connectors with load bar for the best results..
 9.Check the wiring sequence one more time.
Than slide the load bar down all the way and make a straight cut about 0.25 past the loadbar.
A perfectly straight cut is essential here.
That is why we strongly recommend our new QuickTreX™ Wire Surgeon Electricians Scissors.
 10.Insert the connector onto the load bar assembly.
Hold the plug with the copper connectors up and the locking clip facing down.
In this configuration, the Brown Pair of wires should be to the right side
(see diagram on the right)
 11.For Crimping we recommend our QuickTreX™ Ratchet Crimper for RJ-45 and RJ-11/12..
Push the connector all of the way in and then squeeze down all the way on the crimper.
Remove the connector from the crimper body.
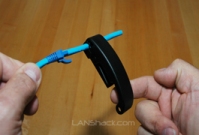
 12.Slide the boots (if used) all the way up to the connector.
 If necessary, use a tapping motion as shown in the illustration.
13.Repeat the procedure on the other end of the cable using the same wiring diagram. NOTE: If you wish to make a crossover cable, than use the other diagram (in this case 568-A)
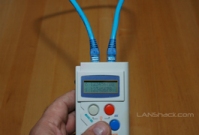 14.Test the cable using a high quality four pair tester.
For this we recommend our LANTEST-PRO Cable Tester.
Notes Regarding Making Category 6 Patch Cable
1)The RJ-45 plugs are normally made for either solid conductors or stranded conductors. It is very important to be sure that the plug that you use matches the conductor type. It is extremely difficult to tell the difference between the two by looking at them. When you buy these plugs, be sure to categorize, and store them carefully. Using the wrong type can cause intermittent problems. The QuickTreX™ Category 5E, 8 Conductor Modular Plugs , OR QuickTreX™ Category 6, 8 Conductor Modular Plugs that we sell are rated for both Solid and Stranded cable.2)Ordinarily, it would be taboo to untwist the pairs of any category 5 or 6 cable. The one exception to this rule is when crimping on RJ-45 plugs. It would be impossible to insert the wires into the channels without first untwisting and straightening them. Be sure not to extend the un-twisting, past the skin point. If you do it properly, you will wind up with no more than 1/2" of untwisted conductors (up to 1/2" of untwist meets the cat 5 or 6 specification).
3)If the completed assembly does not pass continuity, you may have a problem in one, or both ends. First try giving each end another crimp. If that does not work, then carefully examine each end. Are the wires in the proper order? Do all of the wires fully extend to the end of the connector? Are all of the pins pushed down fully. Cut off the suspected bad connector, and re-terminate it. If you still have a problem, then repeat the process, this time giving more scrutiny to the end that was not replaced.
การเข้าสาย
การเข้าสาย Through เช่นจาก hub ไปยัง computer หรือจาก router (ethernet) ไปยัง hub ให้เชื่อมต่อแบบ EIA/TIA 568B ทั้งสองข้าง
การเข้าสายแบบ Cross เช่นจาก hub ไปยัง hub , จาก computer ไปยัง computer , จาก router (ethernet) ไปยัง computer ให้เข้าสายโดยข้างหนึ่งเป็นแบบ EIA/TIA 568B และอีกข้างเป็น EIA/TIA 568A
ตามรูปครับ CAT6
เข้าแบบธรรมดาๆเหมือน CAT 5 นั่นหละ
ถ้าระยะทางไม่ถึง 50 เมตร ใช้สาย CAT5e ก็วิ่งถึง 1000 Mbps ได้เหมือนกันครับ
แต่ใช่หัว CAT6 เข้ามันจะได้แน่นหนามากกว่าหน่อย
50 - 85 เมตร ใช้สาย CAT6 ครับ
อีกอย่างนึงคือ อย่าลืมว่า ลากสายไปถึง 120 เมตรมันก็ยังทำงานได้ครับ
แต่ Speed จะลดลงเหลือ 100 Mbps. และไกลออกไปมากๆ (ยังไม่ได้ลองทดสอบดู)จะเหลือ 10 Mbps ตามลำดับ
ดังนั้นไม่ต้องกลัวว่ามันจะไปไม่ถึง ถ้าสัญญาณรบกวนไม่มากเกินมาตรฐาน.... มันไปถึงแน่ครับ
ผมใช้ CAT5E + หัว CAT6 เดินสาย LAN ครับ
ถ้าเป็น Backbone ใช้ CAT5E FTP หรือถ้าจะเอามั่นใจก็ CAT6 FTP ได้ระยะ 100 เมตรเต็มๆครับ
250 MHz is media speed for transfer at 1Gbps/Full Duplex
100 MHz PCI-X Can transfer at (64 bit * 100 Mhz)= 6.4 Gbps/Half Duplex
Cat5 spec at 100 MHz for 100 Mbps
Cat5E spec at 250 MHz for 1Gbps
Cat6 spec at 250 MHz for 1Gbps and 350MHz or more for 10Gbps


0 ความคิดเห็น:
แสดงความคิดเห็น